So, you have an aspiring little creative in the house? Your child uses your smartphone almost as much as you do? Do they love to photograph and video record everything and anything?
Perhaps they don’t, but you’ve seen the untapped potential in them, and want to give them a chance for an excellent creative outlet. Well, there’s a lot that goes into being a content creator, someone who makes content for channels on YouTube or social media like Facebook, Instagram, and TikTok. And, we have a blog series of tips to help them get started on their road to creatively fueled fame!
How to get started on the journey
In Part 1, we’re going to cover the basics of what’s needed, equipment-wise, for your young director (and star! And writer, editor, etc.)! Obviously, a camera comes in handy. And while there are many good ones out there, and you possibly own one, it’s not needed. Because of how far smartphone technology has come, you’ve probably got a fairly decent camera phone. The Apples, Samsungs, and Huawei of this world do not only have highly intricate sensors on them (sensors being what actually capture the picture). But they also have billions of AI and machine learning calculations going into making that picture the best it can be — in milliseconds.
Yep, your run-of-the-mill video camera, bargain basement price, might have a bigger sensor, but the output quality is still far lower than what a good smartphone is capable of. Add to that the wide range of dedicated camera apps that allow for more manual control of your smartphone’s camera, and you have yourself a pocket-sized beast of a production machine.
But even the best smartphones need assistance when it comes to getting the best footage. You see, the lower the light in a room, the higher the camera’s ISO. These are called low light conditions. The more unsteady the hand, the less sharp the footage will be, and the lower the frame rates will be. But even hands as steady as a surgeon’s won’t be able to keep from the tiniest wobble.
That’s why you need:
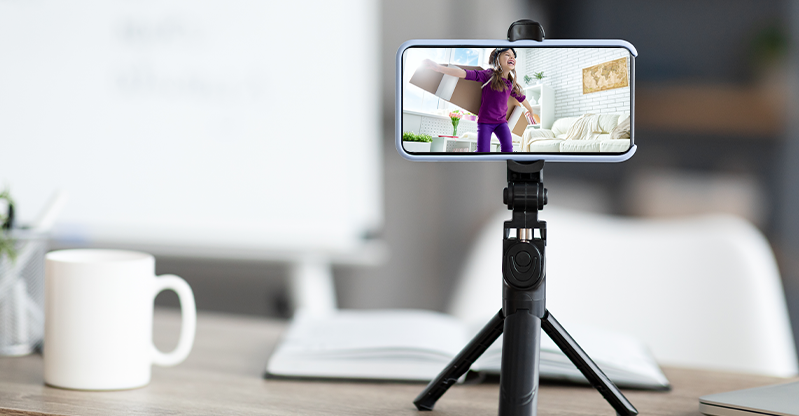
A tripod. And how they get perfect shots.
You know what a tripod is, right? Those three-legged… er… pods… that a camera is attached to for filming or shooting pictures. They allow for lower shutter speeds (which would otherwise make handshake more obvious) which allow for sharper pictures without the risk of jitters. Not only sharp pictures, but clean scenes, held steadily. The hand cam look is only good for war movies like Saving Private Ryan’s Normandy landing scene.
With a tripod, you are able to compose a scene exactly as you want it. So, now where to get tripods… actually, any will do. You do get cheap specialized cellphone tripods. But these tend to be too short and made of flimsy materials. For not much more, you can get decent tripods intended for actual cameras that are sturdy.
Then you buy a cellphone mount separately and attach that to the tripod. Depending on your kid’s height (you may have to help him), a good tripod should be able to be raised as high as a five-foot-seven man. About Tom Cruise’s actual height. On that note, did you notice in that one Mission Impossible, where he was playing opposite Henry Cavill, the Danish actor who is a full six feet, that they seemed relatively the same height? Especially during fight scene scenes? That’s an example of a 2D film illusion, where Tom Cruise is shot right in front of the camera and Henry in another country.
And you wouldn’t be able to shoot that without a tripod! The typical tripod allows the mounted camera to be moved by twisting the handle and swinging it multidirectional style. You can get a decent tripod at any camera store. You might even be able to get the next thing on the list — the camera remote.
How to magically start recording when you’re ten feet away
Sorry, it’s not real magic. But it would be nice if magic really did exist. (Or does it?) It’s the power of Bluetooth™ technology. Bluetooth™ works with a lot of modern cameras and basically every modern cellphone in existence (except for burner phones if you’re up to something dodgy, and don’t want to be caught on camera doing it).
There are neat little devices called camera remotes. There are very inexpensive ones built for smartphones, for both Android and iPhone phones, and you can get them off Amazon or practically any decent online store that offers a wealth of choice. They simply pair with your smartphone and when your child has set up the camera app to video mode, they just need to press the button to start the metaphorical film rolling. No matter where they’re standing in the room.

Green screen! Green screen! We all scream for the green screen!
There’s nothing more fun than appearing in a background of your own choosing. You can be in a spaceship, undersea, or in Jamaica. And how’s that done? Simply by using a green screen! Green screens aren’t even that expensive either. You can buy mini portable ones, with their own stands to hold them up. Or, if you have the space, you can buy a large green screen. They’re really convenient because all a green screen is is a fabric of a certain shade of green that complements everything.
Because it’s a fabric, setting it up is fairly easy. If you have somewhere to place it (we recommend getting stands for them, or else you’ll have to screw the top, along the fabric, into the wall), get a larger one instead. But in a pinch, the small portable ones will work, too.
This will be very useful during the editing process, which we’ll cover in Part 4 of the series. But for now, secure yourself one of these magical scene makers from online stores like Amazon. They’re not very expensive, and they make a literal world of difference — like having your child appear on Mars.
Speaking of which, what good is a green screen without the footage or scenes to digitally replace them with? You don’t even have to spend a cent to get interesting backdrops. For stills, go to Unsplash, which has a huge amount of free, high-quality images you can download. For free videos, which your child can also use as additional footage in their video as well as backdrops, you can get high quality (we’re talking 4K resolution!) at Coverr.

And that’s all, folks…! For now!
As you’ve seen, we’ve got you covered with the basics. And we’ll be back in two weeks for the next part of our series, the preparation of making content, i.e., how to generate ideas and turn them into scripts that can be filmed. To be continued!
If you really want your child to get the superstar treatment, though, “direct” them (see what we did there?) to our courses page. There they’ll see the amazing YouTube Content Creator course we’ve got, and they’ll be well on their way to… nagging you to enroll them? Do it! It’s a fun, educational, and creative-inspiring course that’ll bring out the Spielberg in them. Or the Hitchcock. We don’t know which way they flow.